
1975 Ford Bronco Electronic Fuel Injection Install (Holley Sniper EFI)
- KulAdventures
- Feb 7, 2019
- 8 min read

Updated: Feb 4, 2024
After having too many issues with my 2-barrel motocraft 2150 carb I had to decide between replacing it and going the electronic fuel injection (EFI) route. I realized this is a $400 vs $1500-$2500 decision but in the end, I decided to go with the EFI. I compared the two economy carb style fuel injectors below:
vs
Although both have decent performance record and reviews, I went with the Holley Sniper EFI simple due to it being Holley and the product support that comes with that. The FiTech EFI seems to work well from reviews but has a few negative reviews in terms of tech support, but that is to be expected with a newer company and I hope to see them correct that in the future.
Another big decision I made was to also redo all the electronic ignition related components. Both systems have the ability to link up to the CDI box, ignition coil, and distributor cap/rotor allowing the EFI system to control not only fuel injection but also ignition timing. This seems like a big plus, so I went for it. Holley calls their system the "Hyperspark" system and is compatible with the Sniper EFI. Holley also has a ton of great how-to videos on installing their Sniper and Hyperspark systems.
Here are the parts I needed:
-Fuel Pump and Fuel Hose kit (needs to output 55psi fuel pressure, means new pump and lines)
Optional:
-Fuel Tank (upgraded mine to 23 gallons and a submerged fuel pump)
-4 Barrel Intake Manifold (My stock one was 2 barrel)
---If you have any questions, I really recommend calling Tom's Bronco Parts, they really helped me decide which kit to get, even though they sell FiTech and I went with Holley. They also helped me understand all the parts I needed too and getting the new fuel tank saved me a lot of money in fuel pumps and hoses from elsewhere---
First step was to remove the old fuel tank. Required some cutting due to the previous owner welding a trailer hitch over the fuel tank.


Once out I compared sizes to the new one:

Next, using the fuel tank and fuel pump setup that I got from Toms Bronco Parts that came setup for EFI (FiTech, but will work with Holley Sniper also) I setup the fuel pump and installed it into the gas tank. This kit comes with really good instructions (seen in the back of the picture) on how to setup to fuel pump, heat gun is required though.

Once inserted in the tank and tightened down then the fuel sending unit was also installed (included in kit). Next, I had to install it in the bronco, which takes at least two people, it is a really tight fit, and you have to get the hoses just right. The needs to be two ground wires and two signal/power wires (fuel pump and fuel sending unit).

Pictures of the process:


Next, I removed the old mechanical fuel pump and blocked it off with a block off plate.

Next was to remove the stock intake manifold and carburetor. Take special care to notice where each hose or wire is connected for installing the new intake manifold and EFI. I take a lot of pictures to look back at in case I forget how it all went together.

Remove the coil, distributor cap and rotor, carb, thermostat/thermostat housing, and all wiring harnesses.

Then remove the intake manifold.

Intake Manifold:
I had to purchase an intake manifold and based on my setup I had to decide between the Edelbrock 2121 (Low Rise), 7121 (High Rise), and 7521 (High Rise w/Air Gap). I spoke with Holley, and they recommend their Weiand 8124WND intake manifold which is comparable to the Edelbrock ones above. The concern for me was with hood clearance. The 2121/8124 were a 4.12" carb height and the 7121/7521 were 4.9" carb height, but the higher intake does seem to bring performance advantages and I planned on also adding a spacer to the Sniper EFI (good video on their comparison).
There was a lot of discussion of dual/single plane intake manifolds with a Sniper EFI. Holley states both will work and recommends a dual plane. It seems that all intake issues that I read about people having with a Sniper EFI could be fixed with using an open spacer allowing air to combine above the intake manifold. The Edelbrock RPM Air Gap (7521) has a slit in the plane divider which seems to also correct the issue.
So for now I am going with the Weiand 8124WND intake manifold and plan to either cut out the plane divider or add a carb spacer if I run into issues with the Sniper EFI. I did this to keep the factory height in hopes I can fit an air cleaner under the hood.
Installing the Intake Manifold and Sniper EFI
Make sure you remove all gaskets and RTV sealant. Use solvent or other abrasive cleaners to get all oil off of mating surface.

Install the gaskets using RTV silicone sealer per the Wieand Instructions. I went with a more expensive gasket set (Fel-Pro Performance Set) due to its high rating on Summit Racing.

Then following the instructions install the intake manifold, thermostat housing w/thermostat and carb studs.


Next bolt on the Sniper EFI to the intake manifold and tighten after installing the gasket. If you have space for a spacer I recommend it, I however did not have any extra under hood space.

Screw in 3/8" NPT coolant temperature sensor (included with Sniper EFI Kit) and connect to the wiring harness on the EFI. Make sure to plug the other 3/8" NPT holes with the included plugs (came with Weiand Intake Manifold) or purchase plugs to seal unused holes.

Distributor Cap/Rotor Install
Next step was to install the distributor cap/rotor. Installation was pretty straight forward.
1. Make sure the motor is at TDC (top dead center). The marks on my 1975 do not actually read TDC, they read "ATC 10 IIII 0 IIII 10 IIII 20 IIII 30 BTC" in this case "0" is TDC (ATC is "After TDC" and BTC is "Before TDC"):

2. Set Rotor to Cylinder 1 position (front passenger side cylinder is #1)

3. Install distributor into the engine making sure the gears for the oil pump fit into the distributor. Use the included plastic alignment tool to line up the rotor with the distributor.
4. Tighten down the distributor and install the cap, after marking the position of cylinder #1 on the distributor.
All said and done it should look something like this:


Next start laying out all the wiring for the Sniper EFI and Hyperspark Ignition System (distributor, coil, and CDI). There is a lot of wiring to deal with, but keep in mind if you are installing all of the Hyperspark ignition pieces in addition to the Sniper EFI then there are only 3 wires that need to connect to factory wiring:
1. 12 volt constant supply
2. 12 volt switched supply (12v power when key is in "on" and "start" position)
3. Ground
It may look like a mess at this point:

I took this time to go through my entire wiring harness and eliminate any unused or added wires that were there for the original ignition system. This is not something that needs to be done and if you are not 100% up on electrical work then I may suggest skipping this part and just make sure all loose connections are secured. Keeping that in mind most of my research has shown that many people run into issues with incorporating a new system, like the Sniper EFI, to the old wiring harness and the grounding points. So, if you anticipate some electronic gremlins now may be the time to address them.
If you want to read more about my cleaning up of the wiring in my engine, check out this forum thread.
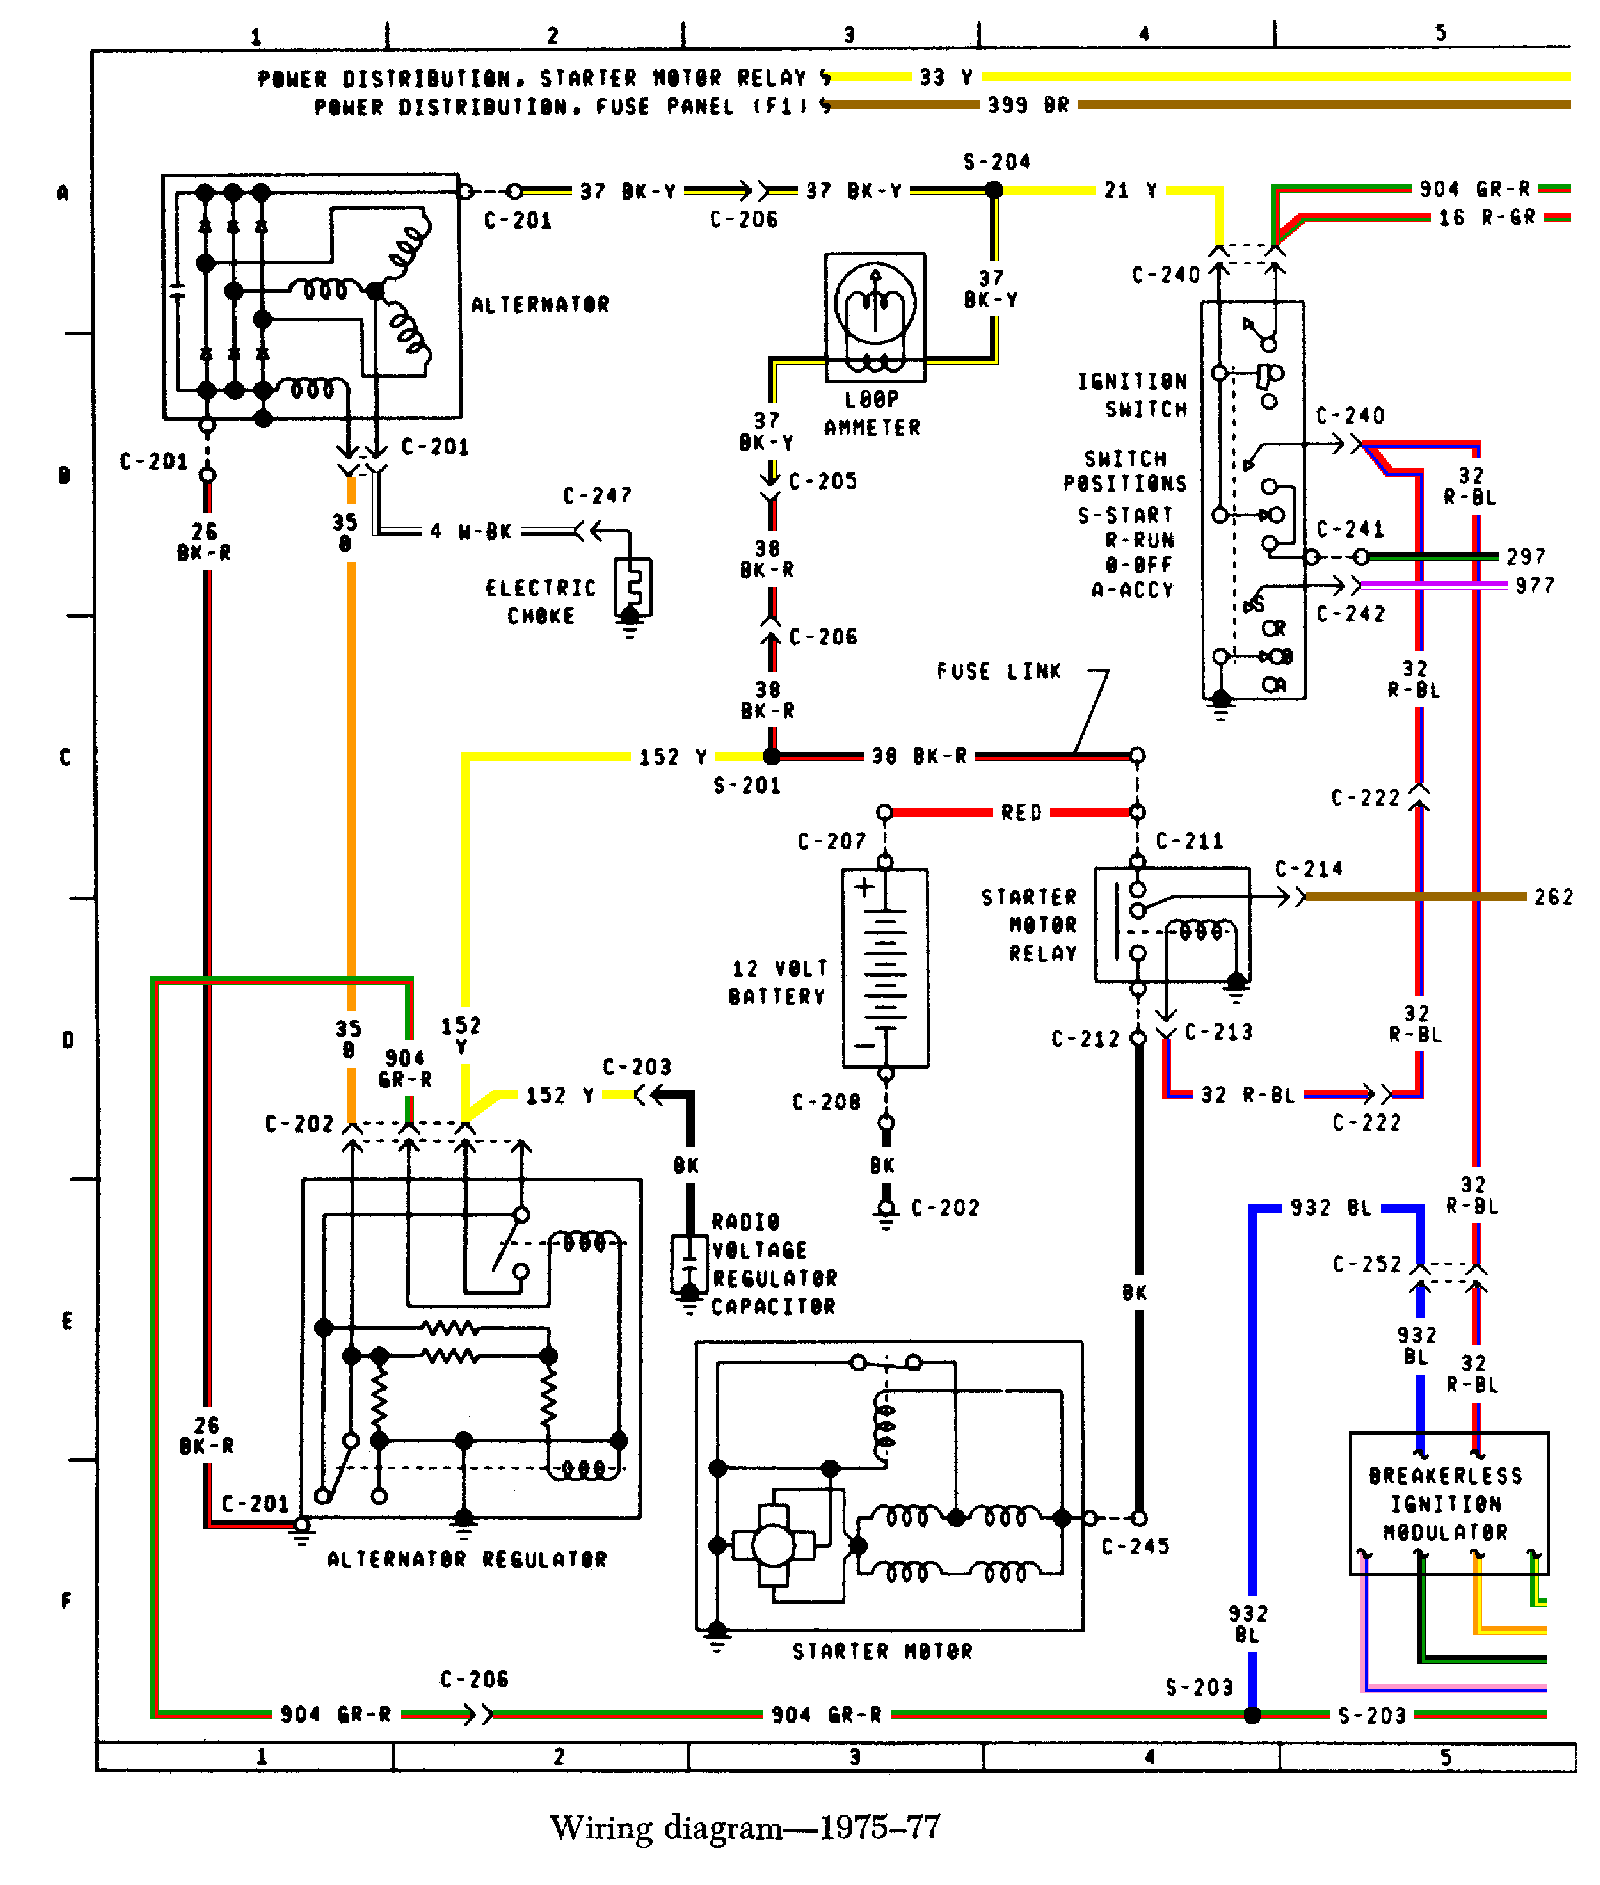
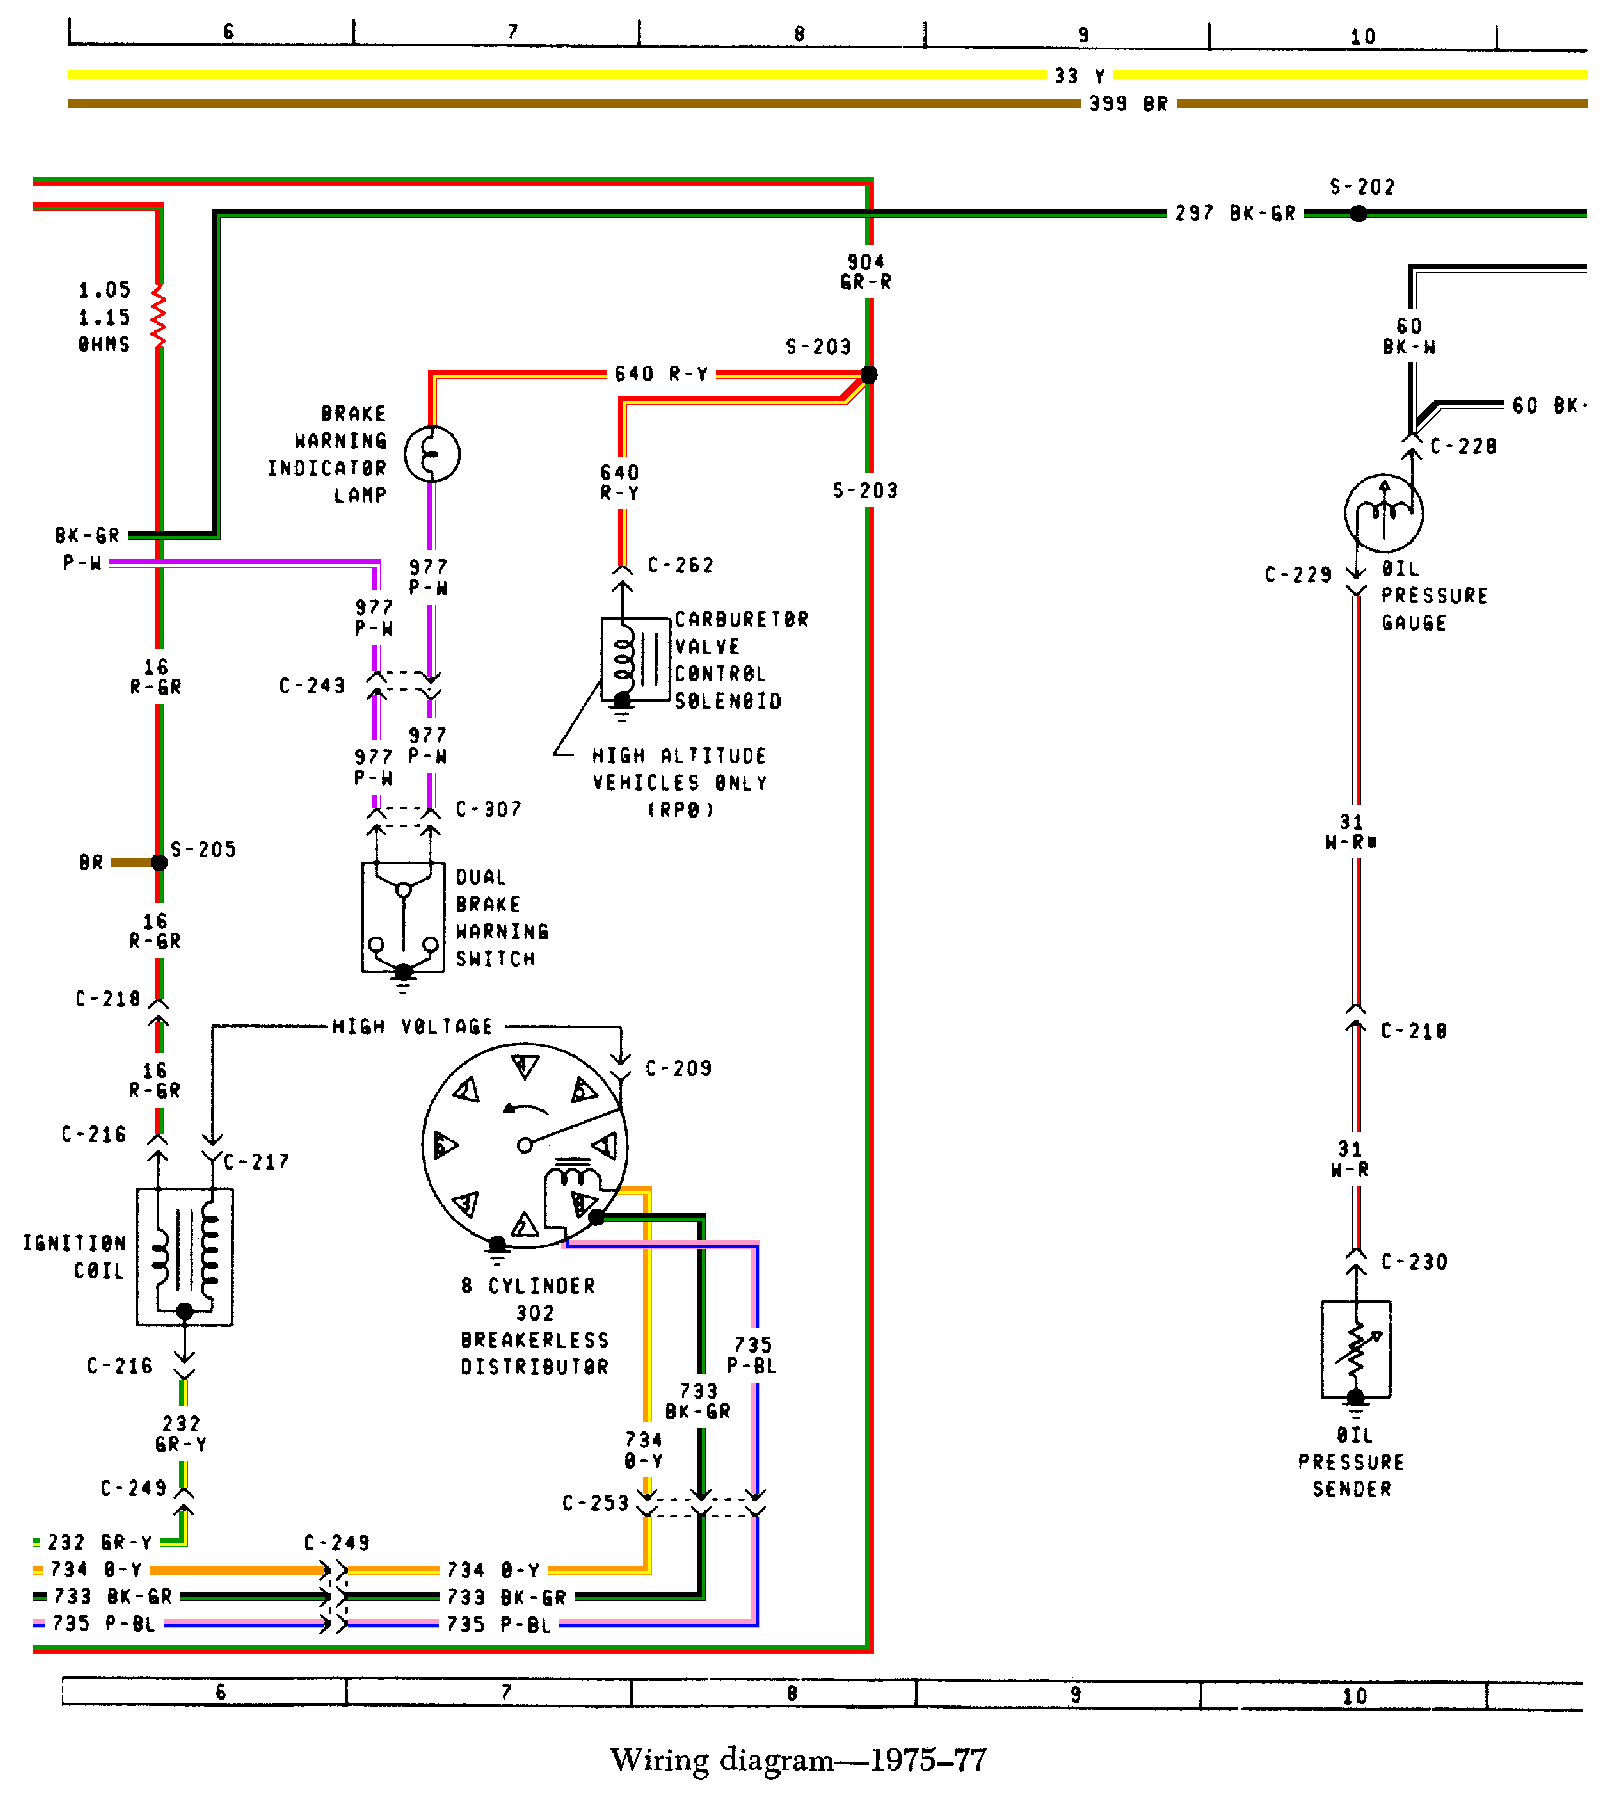
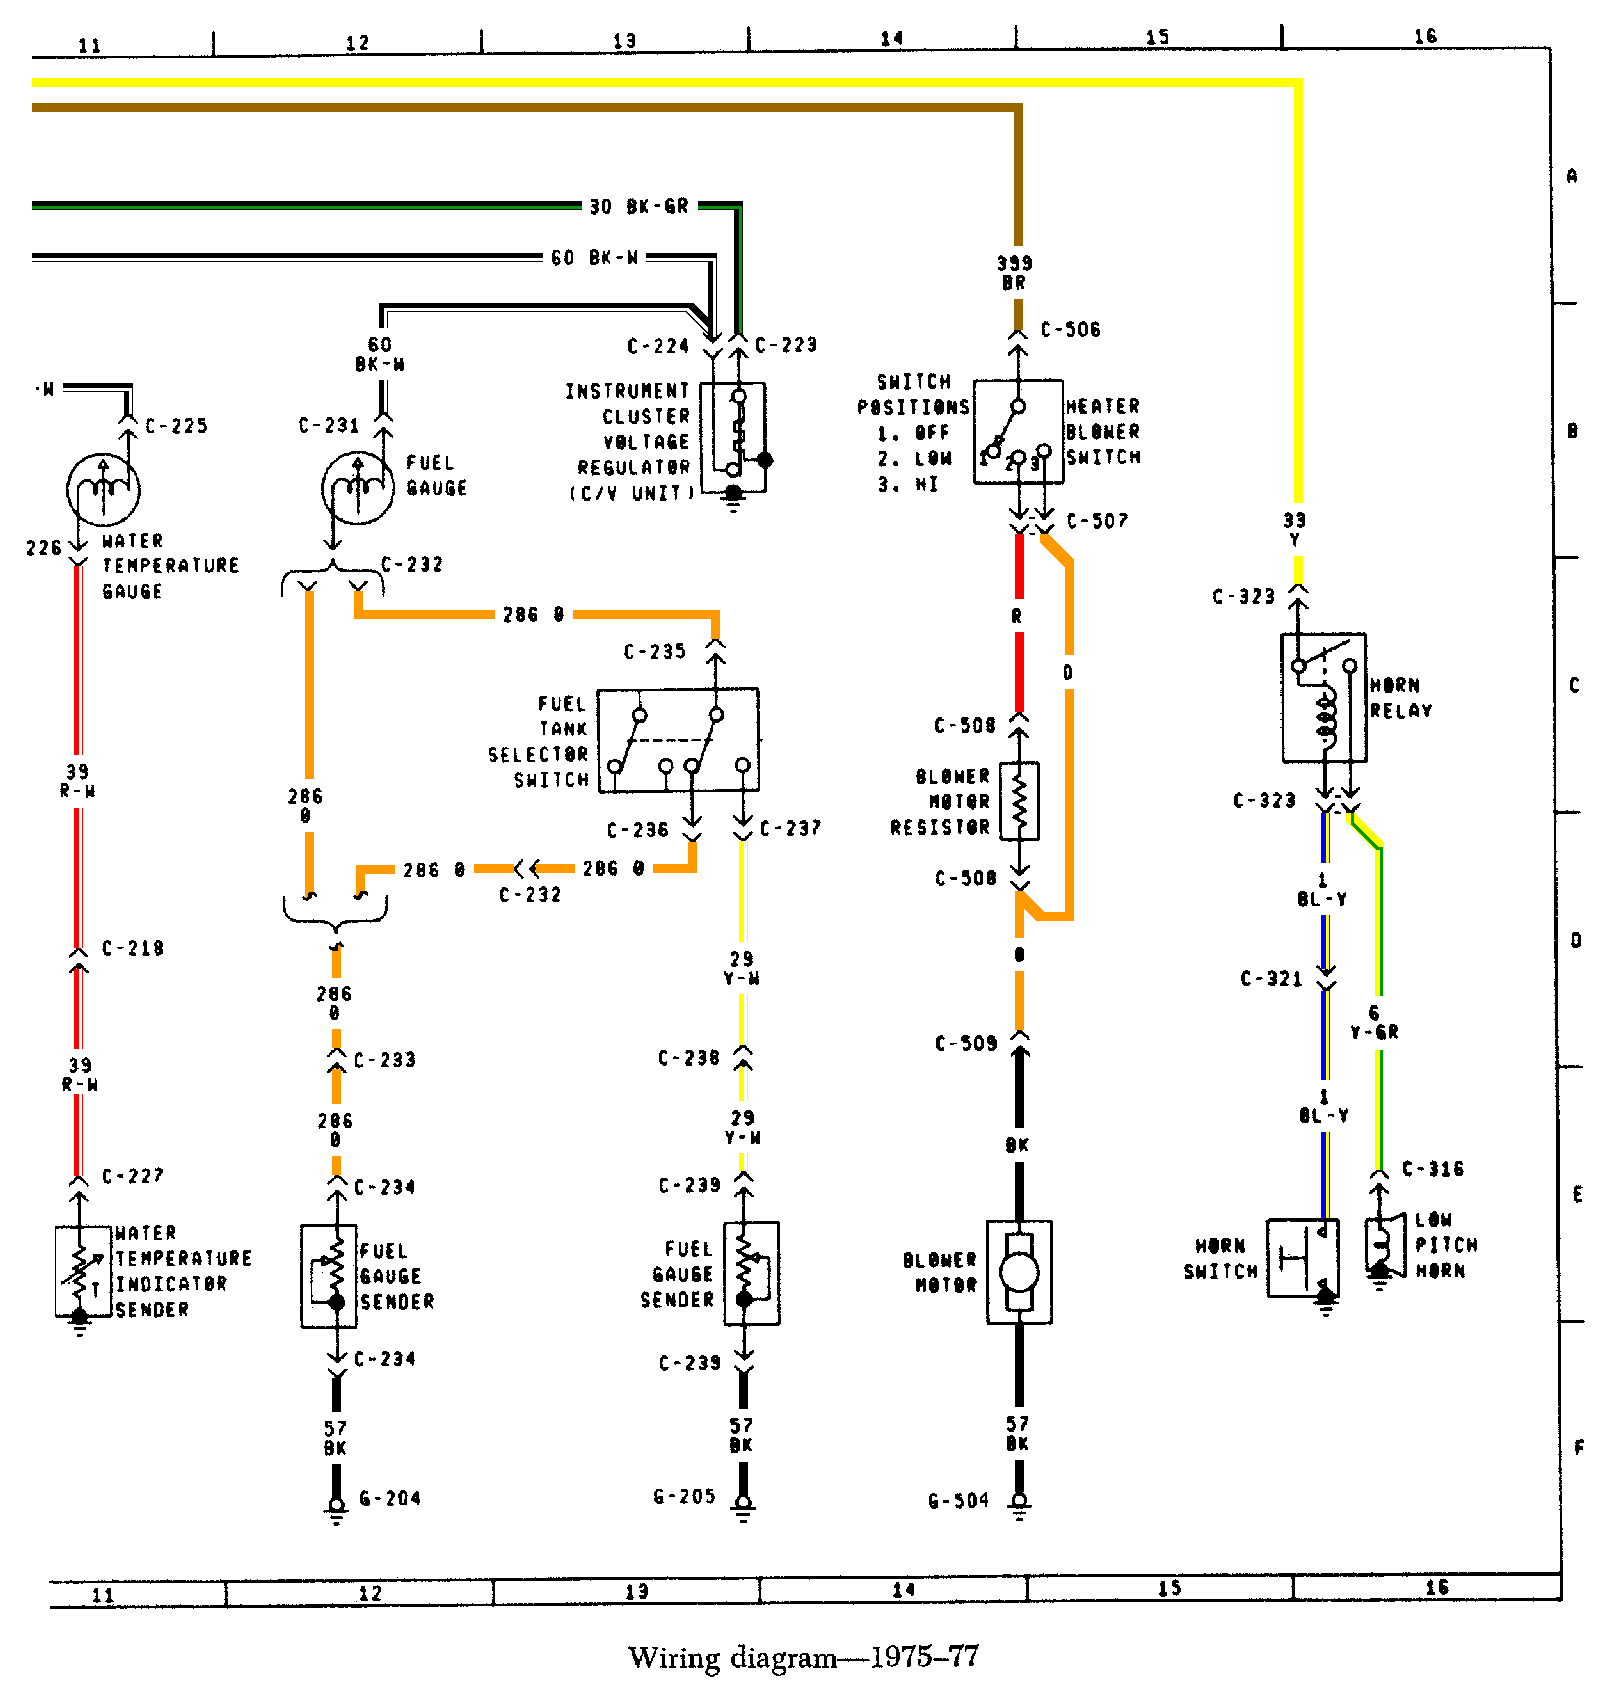
1975 Ford Bronco (302) Wiring Diagram:
Next step is to organize the wiring and make the 3 required connections. I said 3 connections but there are really 5, I just combined the 12v constant and ground from the CDI and the EFI together to decrease the number of connections that need to be made.
I used a connection near the ignition switch for the switched 12v (12v power supplied during "on" and "start") and connected it to the switched input on the CDI/EFI/Distributor (Pink/Red).


I also removed all the excess wires that came with the Sniper EFI harness and sealed them up with heat shrink tubing.


I spent a long time cutting and soldering the wires that came with the sniper EFI. I found them to be too long in most cases and I would rather not have a cluttered engine bay. I then used all the included sleeves to cover up all the wires.


Then drilled and connected the CDI and Coil above the passenger side wheel well and tucked away all wires.

Next, I cut a hole in the exhaust pipe (after they combine, before the catalytic converter) and installed the O2 Sensor.

I had also read a lot about electromagnetic interference with the spark plug wires effecting the Sniper EFI system. So, I contacted Holley about this, and they suggested the MSD Super Conductor Spark plug wires. They are expensive, but probably worth it to not deal with the interference issues that I have seen so many people report. Those were easy enough to install as long as you know which plug on the distributor is #1, if you don't know then remove the cap, put the engine at TDC compression stroke and see where the distributor is pointing, that is cylinder #1 and then just go from there using the chart above.

Prior to connecting the fuel lines, I ran the fuel pump with fuel in the tank (jumped the blue line on the relay to 12v) in order to flush out the line. There is probably a lot of debris in the line from my install and I did not want that in the Sniper EFI body. Once I flushed fuel through the lines, I connected all the fuel lines to the Sniper EFI using 45 degree angled connectors and hose clamps. Make sure the fuel pump power supply is hooked up and grounded. My first test start was thwarted by a bad ground on the fuel pump... so double check that.
Once everything was hooked up, I went through the setup on the Sniper touch screen (good video by Holley on that here), I confirmed the Sniper EFI was getting fuel I fired it up and man did it start quick and run great!!! Really awesome. I have yet to do a test drive for other reasons (lift kit... steering upgrade... etc...), but I will update ones I am able to get it out on the street. So far it is starting really quick, revving well, and idling smoothly.
Here is a video of the first start up:
As of April 2021, the Bronco has not been road driven yet, due to fixing a leaking rear main seal and replace all bottom main bearings. However, I have been running it frequently now to look for any issues. One thing I noticed is that the engine revs way to easily and way to fast. For a light rear wheel drive vehicle that does not work for me. It is to be expected though as I went from a 2-barrel setup to a 4-barrel setup on the same engine with no other upgrades. After doing some research I realized that this is a common issue for many people and is fixed with a progressive linkage for the throttle, which I purchased from EFI System Pro, but looks like you can get them a lot of places now (Amazon Version). I purchased the fixed on which opens the secondaries at about 40% but they do sell an adjustable one also. This $14 fix made all the different in throttle response being manageable.
THIS JOB IS CURRENTLY IN PROGRESS (April 2021) - More coming soon...
Useful Links:
Holley Forum - Single or Dual Plane Intake Manifolds (Another similar forum post, and another similar forum post)


Comments